What You Need to Shoot Food Videos, According to a Video Creator
Three, two, one, take action
Hi! I’m going on a side quest from my typical recipe and cooking-focused newsletter content for a special free edition all about video!
This post was inspired by
’s recent newsletter about YouTube, and ’s post about podcasting. Their willingness and generosity to open up about the ins and outs of creating content got me thinking about an area of expertise I specialize in: social media food video production. Think: the scrappy, socially-native, vertical videos you film & edit yourself and post on IG, TikTok and here on Substack.
TLDR: You Just Need a Phone
If there’s one takeaway from this post, it’s that you don’t need to buy anything to shoot videos for social, aside from having access to a cell phone with video functionality.
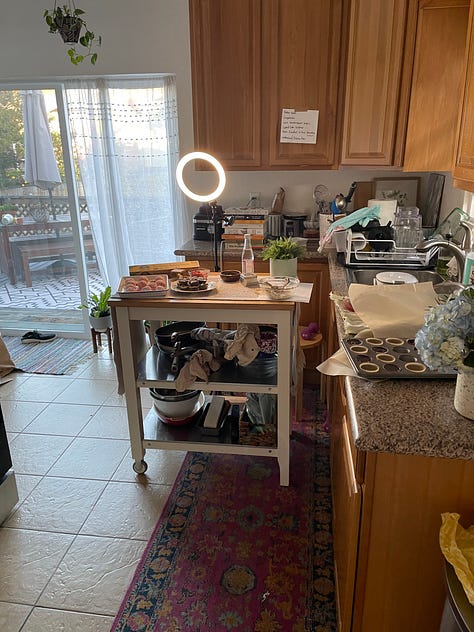
I hear a lot of “if I only get the right _, then I can shoot videos”. The right phone, tripod, kitchen cabinets, lighting, manicure. I am not immune to this sentiment. For years, I only shot overhead, for fear of being judged by my unaesthetic rental kitchen. If I’m being honest, I was also scared of being seen.
Perfectionism can get in the way of doing what scares you. If you are inspired to share, shoot your shot! Don’t wait until you have the “perfect” set up.
Just get started.
In this post, I’m going to share the tactical steps for getting started on shooting your own food videos.
About Me: Video’s always been my thing. I’ve been working in food video production since I graduated from culinary school in 2011. I moved up the ranks at a food media production company, assisting with food and prop styling, writing scripts and running day-to-day studio operations. After a few years running a cooking school, I joined a food & travel TV crew as lead culinary producer. Later on, I acted as on-screen talent for a major retailer. Post-2020 layoff, I was hired by a social marketing agency to manage a team of food video creators. I often joke that my last employer (a Fortune 500 cookware retailer) hired me because I was an experienced professional who also knew how to film TikTok videos.
What I’m Doing Now: Since leaving my corporate job, I now split my time between teaching cooking classes, private cheffing and creating recipe videos for CPG brands as “white labeled” content through a marketing agency. I also create content of my own and take on paid partnerships of my own on Instagram. I am a full-stack production team of one. For my owned content, I develop, plan, prep, cook, shoot, dish wash, script, edit, distribute, store and market these videos to support my work here on Substack.
Why Is Video Important? For better or worse, video is still king. If you are looking to market your business or share ideas and insights online, learning how to self-shoot and edit is a valuable tool - and it’s relatively inexpensive if you do it yourself.
The food video space, in particular, has evolved since the days of Jacques & Julia (my icons) on PBS - but remember, they were pioneers at the time. They saw an opportunity to teach and inspire lots of people on a large scale and went for it! I mention this because a hurdle I often hear from folks is the cringe factor. What if (my ex, that girl from high school, my former boss) sees me? What if they think I’m dorky? If you are (quite literally) putting your self out there, it’s helpful to give a few less Fs on what people think about you.
Interested in YouTube? Check out Carla’s post on the ins and outs of YouTube working with a small production team. I co-sign her insights on the costs of hi-fi food video production on the platform. Another thing to consider: YouTube Shorts (their version of TikTok) is an often under-utilized platform for vertical video, and worth playing around with.
Here’s what I’ll cover:
Video equipment
Video production
Video editing
Video storage
Equipment
Remember what I said about only needing an iPhone? It’s true! If you are due for an upgrade, do it! I recommend an iPhone with 3 cameras for the best quality. I’m a chef, not a mobile phone expert. I do recommend chatting with your phone retailer to find the model that fits within your budget and shooting needs (i.e. you may not need the latest model).
Once you get used to shooting with your phone, I would recommend starting with one piece of equipment and adding from there. You don’t need a lot of STUFF to make great videos! Don’t let buying the “right” tripod/light/rig get in the way of getting started.
Rigs
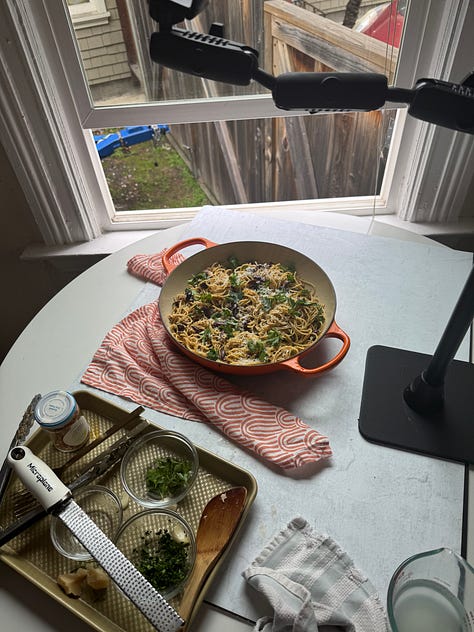
A camera rig is an accessory that attaches to the camera to allow you a wider range of functionality, stability and control. These are particularly helpful for cooking videos, speaking to camera or wider angles. Rigs are often adjustable and allow you to shoot hands-free. Here’s what I’ll say about rigs - you get what you pay for. The prices range from $15 for a tripod on TikTok Shop to the hundreds of dollars for heavy weight C-stands used on professional sets. I have a few I like and use for different jobs. They are all on the less expensive side.
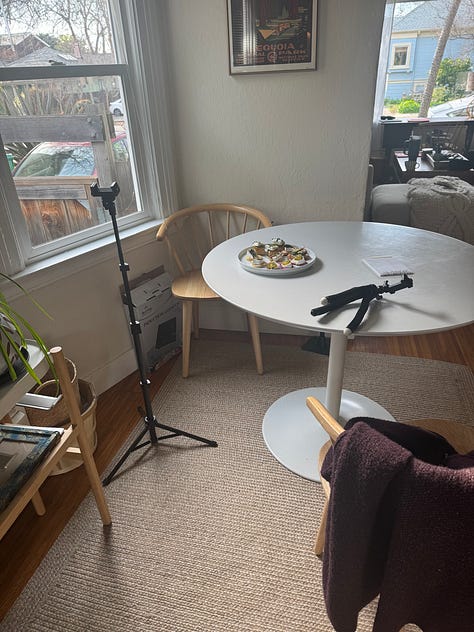
Depending on your shooting space, you can prop your phone up on a 28-ounce can of tomatoes and it will work just fine in some filming scenarios.
Rigs to Consider
6” Extendable Tripod
Great for capturing tall and wide angles. If storage and maneuverability are important to you, select a lightweight model that collapses down for storage and travel. I recently taught a 1:1 video tutorial and switching them to a more streamlined, agile tripod was a game changer. I’ve been happy with this one, but I also have a gooseneck version that can achieve more high, 3/4 shots.
Mini Tripod
Great for setting on a surface for talking to camera and straight-on-shots. A good alternative to a 6” tripod, depending on your surface/height if you film cooking videos. I like this one.
Overhead Video Mounts
Perfect for overhead, “hands only” videos. I have tried the table-clip versions and switched over to free-standing. They’re easier to move around and work on any surface. I recommend Arkon mounts.
Phone Stand
The smallest rig! A nice alternative to leaning your phone on a 28-oz. can of tomatoes. Great for talking to camera. Doubles as a landing pad for your phone next to your desk or while charging. I recommend this one.
Handheld Rig
If you do a lot of event or outdoor filming, a handheld iPhone rig is helpful for stabilizing your phone for pan-overs and the ergonomics of holding your phone all day. Anytime I have my handheld rig on set, I get a reaction from the crew. It makes you look super legit, and you are! It’s also helpful for the ergonomic benefit vs. holding your phone all day. This style is great.
Microfiber Cloths
Clean your screens! The little cleaning cloth that comes with eyeglasses works well here. I also recommend microfiber clothes for streak and lint-free cleaning for your screens, glassware, stainless steel knives and anything shiny. Hate the texture, love the result.
Production
Lighting is Everything
Natural light is the best light, and it’s free. Luckily, Daylight Savings gives us a couple more hours of light in the day to shoot. For those of you who work a 9-to-5, sneaking in a little dinnertime video sesh is a lot easier in the warmer months.
But what if your shooting space isn’t south-facing? I tip my hat to creators who film in random areas of their home where there’s the best light. I do this on occasion. I recently shot a really garlicky anchovy tuna pasta next to my living room sofa because the light was good and, yeah, no, not doing that again.
I am also in awe of creators who shoot in direct, bright sunlight. Are they waking up at 6am to prep and time the light just right? Maybe. I do admit that I’ll look at the weather report to plan out my shoots on brighter days.
Bright but overcast days are my 2nd favorite type of light in which to shoot, with full, even light and no risk of glare or shadows.
DIY Filter Hack
My friend Caitlin, a professional photographer, recently shared a tip with me if your light is uneven or challenging. Tape wax paper to your window to filter and soften the light. I’m going to try it!
Find Your Light: To find your best light, move around your space with your phone, holding out your hand or an object. See how the light changes when I go from next to the shaded window to the kitchen with overhead lighting to the glass door and back to the window? Which spot would you choose?
Artificial Light: I’ll use a clip-on light to brighten things up, especially if I’m speaking to camera. You can change the temperature (more warm/yellow, more cool/blue) and brightness. I donated my ring light years ago. It was just too clunky and I never used it. Bonus tip: clip it onto your laptop during your next important Zoom meeting at look AMAZING.
Shoot in 4K
My preferred video setting is 4K-24. The 4K resolution (vs. HD) refers to the pixels and offers 4x the detail as HD, meaning you’ll get crisper, clearer, ore cinematic shots. The number refers to frame rate or fps (frames per second) meaning that a 24 fps will result in 24 individual frames displayed per second to create the illusion of video. Wow, didn’t expect a video technology lesson here, did you? (thanks, Google!)
I’ve tried shooting in 4K-30 but it’s almost TOO cinematic for my taste. Play around and see what works best for the style you’re after.
Fill the Frame
I’m not diving into the strategy or creative development side of video in this newsletter, but I do recommend a “fill the frame” approach. Crop or frame your shots so that the hero shot (you and/or your food) is the focus. Play around with cropping in your editing app and know your safe zones by platform. Here’s a handy guide.
Editing
I used to edit my classmate’s writing assignments in college with a red pen, so it should come to no surprise that I LOVE video editing. Trimming down 20 minutes of footage into a :30 clip is so satisfying to me. I know that it’s often the part that causes the most headaches for people, so I am going to break it down.
Choose Your Editing Platform
Don’t Shoot In-App: I learned early on in my social video career NOT to edit in-app. These platforms don’t like you to share (and I’m not going to get into the algorithms…) but it’s widely considered a no-no to have watermarks on your videos that you download from one platform and share on another. Some say the algorithm dings you for this, but I say it just looks unprofessional.
But Sometimes It’s OK: But if you’re just dipping a toe in, editing in-app CAN be useful. There are tasteful templates (and also a lot of cringy ones) that let you upload, say, 8 clips that are instantly edited and timed to a fun Justin Bieber song. Not a long-term solution, but a fun place to start.
Choose an App: There is a wide variety of options when it comes to video editing apps. I’ve been using the InShot app on iPhone for years. After sitting through one too many ads on the free version, eventually I sprung for the yearly subscription. To me, it’s a deal at around $20. The Splice and Capcut apps are similar. Try a few out and see what you like best.
Level Up Your Editing: If you’re looking to take things to the next level, Adobe Premiere Pro (about $23/month) is an excellent program you can download for your computer. Their Premiere Rush app is available on your phone for on-the-go editing. I am contemplating switching over to Premiere for the ergonomic benefit.
Find Your Editing Style
So you’ve shot your footage, you’ve downloaded it to your app, now what? If you’re just getting started, start small. Start by trimming the beginning and end off of a simple video. Progress to slicing - cutting clips into smaller clips to cut out unnecessary footage and create visual interest, like in this video:
Notice the cauliflower chopping scene above. Short, quick cuts Now lets compare to the original footage:
Jump cuts (abrupt transitions from one frame to the next) are very popular right now on social, with the intention of capturing viewers interest. It’s also helpful for cutting out the ‘ums and uhs' and other filler words when speaking to camera. Maybe your editing style includes more romantic, slower pan-over shots, or you love a zoom-in moment.
Practice + Patience
Learning to shoot and edit takes time, patience and practice. Yes, you can use pre-fab templates to get started, but the more you edit (and learn what types of videos resonate with your audience) the more efficient you’ll become.
Video Elements: VO, Music, Graphics
Voiceover (VO) can be helpful for storytelling and personalizing your videos. Contrary to what I’ve told you above, I DO often record these in-app before posting, as I find the audio quality to be superior to InShot. Sometimes, I record VO in my Voice Memo app to then upload as audio in Inshot. This can be tricky if you want to align your VO with action (we call this “see-say”) and avoid scripting (unless you are a really good voice actor, it’s often pretty clear when someone is reading a script and this can come across as, well, scripted!) To record VO via voice memo, it’s helpful to have the video up on your computer (or another screen) to narrate and time it just right, if you don’t want to get into audio editing. Audio editing is quite fun (I love cutting out the filler words) and in most video apps, functions similarly to how you edit video clips.
Filters: I don’t recommend applying pre-fab filters. They can look, well, filtered, and remind me of the early days of IG. I do recommend playing around with increases to the lightness, color and saturation in your videos.
The last word:
If you’re shooting in good light, there’s very little that will need to get fixed in post when it comes to visual effects.
Storage
If you shoot a lot of video, expect to do regular digital housekeeping. You may also need to upgrade your iCloud storage. I pay $10/month for additional storage.
I would also recommend getting into the practice of deleting old clips (for some reason, I always do this waiting at the airport?) Depending on the video editing app you use, deleting old clips MAY delete them from your stored videos, too. Ack!
Ideally, you are regularly uploading your final cuts and any clips you want to save to an external depository, like a physical hard drive. Google Drive is fine, but I have found that uploads can be slow. I’ve also seen it downgrade video quality. And then there’s the issue of storage capacity. In my experience, the more you move around a video file, the worse the quality can get.
Frame.io is a great place to store and organize your final cuts, in addition to file sharing capabilities. If you collaborate on files (i.e. you work with team members or clients) this is THE platform. The free version has limited storage, but the annual pro membership is around $150 and is much more robust. If you work as a content creator, Frame is an essential tool.
Closing Credits
Remember, just get started! Some of my worst-quality videos are the ones that have “performed” the best according to my key metrics (for me, it’s eyeballs). It doesn’t matter how fancy your phone or snappy your editing skills. The CONTENT of the video (at its most basic, what you have to say and share) is what matters.


Clare! This is such a helpful rundown. I loved doing TV and working with a crew, but I feel pretty overwhelmed every time I try to do my own video, and I know getting a video strategy in order to help grow my podcast/substack needs to move up my priority list. Thank you for this!
DEFINITELY saving this for whenever I get brave enough to actually do video. So many helpful tips!